Introduction
For those who don’t have Sales Navigator (or have never heard about it), it is a paid tool on LinkedIn that helps you find your ideal clients, build relationships, and generate warm conversations. Sales Navigator has a number of features to help with this, from Advanced search filters to Lead and Account Lists, and from sales insights to Account Mapping.
Today I’m going to focus on Sales Navigator’s Advanced search filters. There are three different levels of Sales Navigator. Core, Advanced, and Advanced Plus. This article will focus on the Core product’s search so, for example, the Buyer Interest filter will not be seen or discussed below.
For those with a Free LinkedIn account or other LinkedIn Premium accounts, this article will hopefully enthuse your appetite for taking a look at Sales Navigator. For those of you who already are users of Sales Navigator, it should be a useful check to see whether you’re on track using Sales Navigator’s search features.
Who to target?

Whether you use the search on Sales Navigator or LinkedIn.com, the most important step for setting up effective searches happens way before you get to a search box.
Identifying who your ideal client is that buys your offer is vital. Get this wrong and you could be filling the top of your sales funnel with people who are never going to buy from you, no matter how targeted your search is.
To help with this, think about your clients who have purchased your offer in the past.
- Were there commonalities between them?
- Were they in specific industries?
- Were they of a specific size? Do you have a sweet spot for company sizes you work with?
- Are your clients local, national or international?
- Who is the decision-makers and influencers for the purchasing decision?
- Where should this campaign be targeted for the best effect?
Fail to identify your ideal clients and the whole campaign could be severely impacted. Do not rush this first step because your ROI depends on choosing your best audience.
Personas Functionality
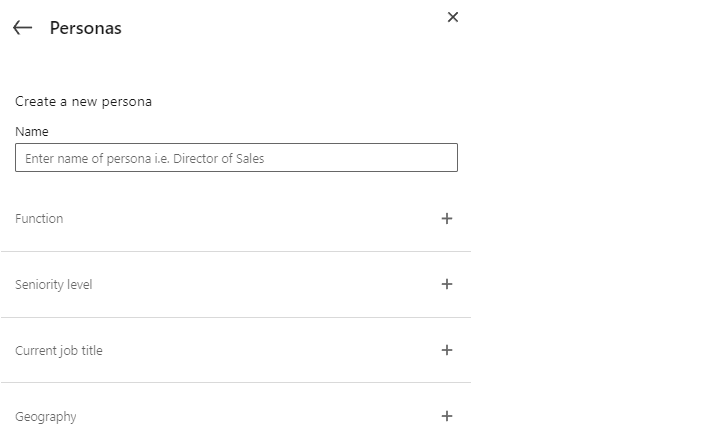
Before we get into reviewing the searches, there is one section I need to discuss briefly, Personas. The reason for this is they filter into the search and some people may use them as a ‘quick’ way to create their search, which is what they are designed for.
You can access your Personas section by clicking on the Persona link highlighted by the orange oval below.

The Personas section allows you to define your ideal clients (or personas) based on 4 characteristics: Function, Seniority Level, Current Job Title, and Geography (location).

The functionality in the Personas section for the Function, Seniority level and Geography filters are exactly the same as in Sales Navigator. However, the ‘Current job title’ filter doesn’t work in exactly the same way.
In the Personas section, Boolean search (an advanced way of searching data) can’t be added and only individual job titles are able to be added. This is not disastrous, but using Boolean search is far more effective at generating the exact targeting I’m looking for, improving the relevance of my search results.
That said, do set up personas because they filter through to other areas of Sales Navigator, so they are something you should set up. Make them as targeted as you can using these 4 filters and the limitation with the Job title filter.
The Two Searches

Now that we have got to the search section, the first thing to note is that on Sales Navigator there are two different searches: Lead filters and Account filters.
In order that the terminology is clear, in Sales Navigator Lead refers to people. I personally don’t like the word lead because it infers a person is already interested, which is not true. But lead is people. Whereas Account Filters refer to companies.
The Account filters search is great if you want to create a list of target companies, whereas the Lead filters search is when you’re looking for relevant people to reach out to. The two can be used in combination.
Let’s look at the two searches.
1. Leads Filters Search
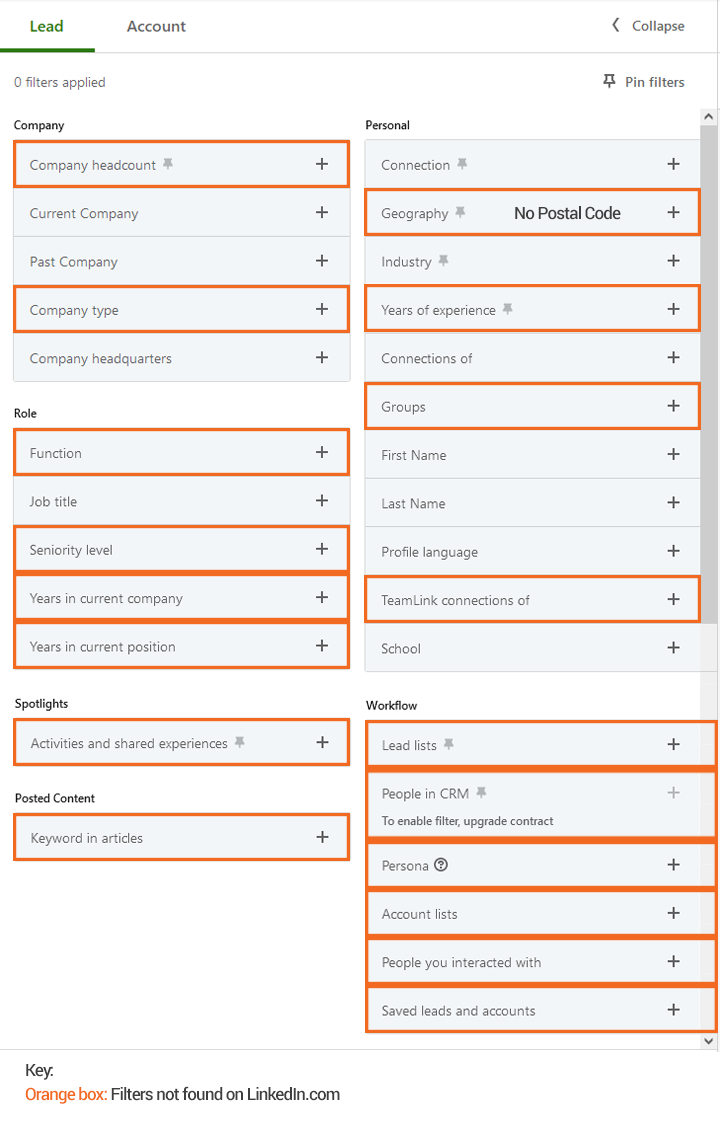
As you can see from the image below, there are many search filters in Sales Navigator and much more than on LinkedIn.com. As per the Key, the orange boxes represent the additional filters not present on LinkedIn.com.
These additional filters mean you can be very granular so you get exactly who you want to target in the search results. Remember our goal is to be as targeted results as possible, so we fill the top of the sales funnel with the most relevant people.

So what are some of these extra fields?
The first filter of note is ‘Company headcount’ which has filters starting from Self Employed, to 1 -10, all the way up to 10,000+. So, if you have a particular company size that is a right fit for you, there is a filter to help you to zone in on those companies.
Within Geography, there’s the ability to be very specific on the ‘Geography’ with the ability to search by a postal code and a radius of that postal code to enable you to target local customers.
You may want to select ‘Years of experience’ to target those who are highly experienced at what they do.
The search includes Account lists. So, if you have used the Account filter search to find a list of targeted companies and you have saved them to a list you can then pull in the data into the Lead filter search. The same is true for Lead lists.
We have the Persona filter that you can use to speed up your ability to create a search.
I could go on and on with all the different ways you can use all these additional filters, alone or in combinations, but I don’t want to give away all my secrets. 😊
The bottom line is, Sales Navigator’s search provides you with the ability to segment your existing and future audience into whatever you want.
Another great feature of the Leads Filters search (and Accounts filters search) is that it comes with the ability to save your searches. This is a massive time saver because you can work your way through a list and remove people once they’re processed. You can’t do this with the search on LinkedIn.com.
👉 Spend time going through the filters. Click on the plus button to reveal the functionality below it. Which filters are most useful to identify your exact target audience? Which filters can you use to help you nurture your existing audience and to create a new audience? Play with the filters and look at the results. Set up searches and save them with descriptive names so you know what they’re for.
2. Account Filters Search
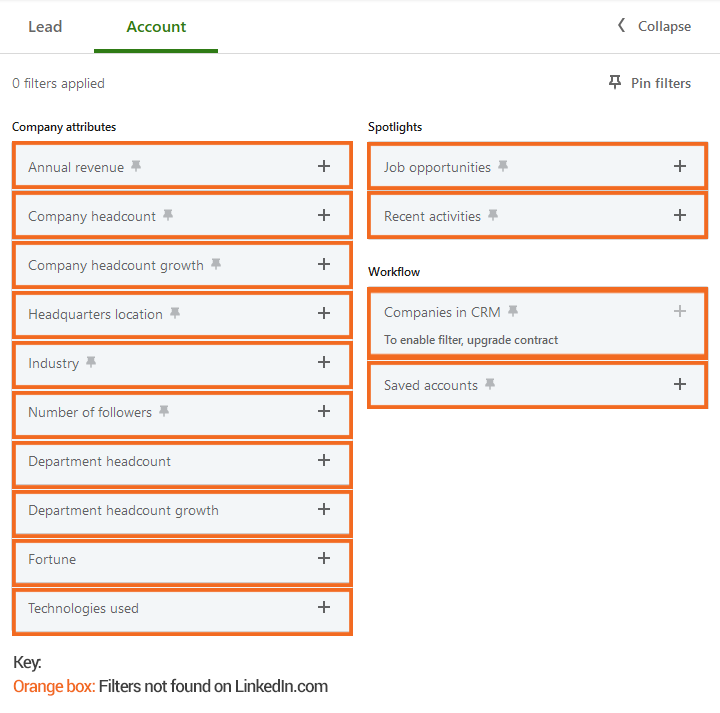
As mentioned above, the Accounts Filters search is for finding companies. This search is not available at all on LinkedIn.com. The search allows you to build up a list of companies to target based on the criteria you select. As mentioned above, this list can be pulled into the Lead filters search.
Let’s look at the filters:

When you’re looking for companies there are 14 different search filters in the Core product.
You can use ‘Annual revenue’ to target companies with a specific turnover.
You can use ‘Company headcount’ if you want to work with companies of a specific size.
‘Industries’ is a commonly used filter (in both Lead and Account filters searches). It is worth noting that there are now 420 different industries to choose from to get super granular, there used to be 149. Like many filters in Sales Navigator, with industries, you can add multiple.
The ‘Technologies used’ filter could be amazingly useful to identify the companies who, for example, use a particular software that you specialise in. Create your search and you have the accounts to target.
In the Accounts filters, there are a number of growth filters and other filters that provide insights into which companies may be worth reaching out to right now.
👉 If you don’t have a list of target companies to target. Create your own. Use the filters to find the exact accounts you want to target and save them in a search with a descriptive name so you know which companies are in that search. Save them into an Account list so you can pull them into the Lead filters search.
Conclusion
I’m a huge fan of Sales Navigator because it provides me with many useful insights and features, the search being just one of these. Using it provides us with the functionality to focus on exactly the right people, save a huge amount of time, start warm conversations, and generate new clients.
When setting up searches, experiment with the filters to find out what combination works best for you in finding your exact ideal clients. Look at the results to check the relevancy. An element of trial and error is required, but this will pay dividends for the overall performance of the campaign. When comparing the search on LinkedIn.com to Sales Navigator’s search they’re not in the same league.
Identifying and finding your ideal clients is vital and it’s by far the most important thing you will do when prospecting. Don’t rush this step because, as I’ve said already, you don’t want to put the wrong people at the top of your sales funnel.
Out of all the activities to generate new business on LinkedIn, using the search to identify your ideal clients is the activity people struggle with the most.


